Sunday, October 25, 2009
I just created a test with the Blender 2.5 system, animato, and the "Clumping" feature. This video shows the clump factor from -1.0 to 1.0 over a 10 second period. Thus, 5 seconds in has a clump factor of exactly 0. This video had default lighting and default blender material. The only variable is the clumping factor. Maybe it will be of use to somebody looking for the correct clump factor for a model.
Sunday, August 30, 2009

Thursday, August 27, 2009
Rendering Smoke in Blender

Hello all. I stuggled a little bit while trying to figure out Blenders new smoke & volume features and I thought I would write a little guide to make the process easier for others following in my footsteps. I'm righting this tutorial for Blender build 22805 which can be found here. Keep in mind, this proceedure might totally change in the future since this is an early development build of Blender 2.5.
1. Open the build. Start by saving the file so the cache knows where to save. Hit Z to enter wire frame mode.
2. Add a plane to the scene. Scale it down and fit it inside the default cube.
3. Add a particle system to your plane. Set the physics option in particles to "No". On the Render Panel, set the option to "None".
4. Go to the physics tab and add the smoke to the plane.
5. Set the radio button to "flow". Select your particle system in the text box. The default name is "ParticleSystem"
6. Select the default cube and add smoke to it in the physics tab
7. Set the radio button to "domain". You can play with the other options to have fun with your smoke, but it is not necessary.
8. Go to the material tab for the default cube. Select "Volume" from the radio buttons that have - Surface, Wire, Volume, Halo.
9. Under the Shading settings, set Density to 0.
10. Go to the texture tab for the default cube.
11. Under type, select "Voxel Data"
12. On the Voxel Data Panel select "Cube" as your domain object.
13. On the influence panel, check the option "Density".
14. Go to the World Panel and set the horizon color to black to better see the smoke.
15. Hit alt-a to let the simulation run... Cool smoke!
16. Stop the simulation on a cool looking frame.
17. Drag your lamp next to the camera so you get some good front lighting on the smoke.
18. Hit F12 to render and get something like this!
Wednesday, May 20, 2009

I've been away awhile as my life has gotten quite hectic recently. I just got married on May 1st and then went to the Dominican Republic for the honeymoon. In addition, we just got a new family member, Luna, a Siberian Husky puppy. Needless to say, my time has been quite limited recently.
On to recent graphics stuff I've done!
I just followed an excellent tutorial by Jonathan Williamson and learned a few cool tricks. It was fun watching a quick work flow on a simple project. You can watch the tutorial here:
Model a Steampunk Telescope
Monday, March 16, 2009

Monday, February 16, 2009
Texturing goodness

I followed this tutorial in order to really dig into texturing work. I learned a lot that I will be able to apply to my own images.
Brief notes for future reference
Color Map:
UV Template - Screen
AO Pass - Multiply
Scratches - Screen+Alpha (Hard scratches)
2nd Scratch Layer - Screen+Alpha (Soft scratches)
3rd Scratch Layer - Screen/Lighten + Alpha (Soft Scratch Pattern)
Bump Map from Color Map:
Grayscale
Scratch Layers - Invert Color + Multiply
AO - Off
Grime - Lowered or off
Decals - Off
Textured Fills - Filled with solid
Specular Map from Color Map:
Grayscale
Darken Less Reflective Areas
Saturday, February 7, 2009
Discombobulate!
Discombobulate from Sean Olson on Vimeo.
This is a simple cube with the "discombobulate" script used on it. It's got approximate ambiant occlusion and ray tracing applied to it. But the thing that makes this video extra special, is how it was rendered. It was rendered using distributed computing. Not just a renderfarm, but a world wide networked render farm. I'm one of the first people involved in the project, so we will see how much it grows, but hopefully this will be the way to render in the future. It gives the possiblity of rendering a full length movie in a fraction of the time it would take to render on one machine.
www.renderfarm.fi
Friday, January 30, 2009
Extracting Normal Maps from Photo Textures
I've been playing with normal maps recently and learned a cool trick. Usually, you have to have a 3d object to make a normal map of the object. But, I learned a way to "Recover" normals from a photo texture, thus giving the texture the illusion of depth.
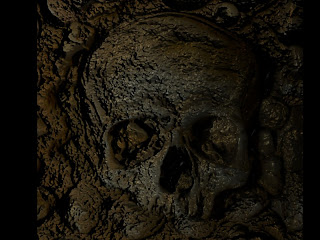
Original Texture

To do this you:
1. run the texture through a normal map filter in your chosen photo manipulation application.
2. Blur the image slightly to remove the fine details (I did not do this step enough on the example)
3. Create a new layer in "overlay" mode
4. Use a Gaussian Blur on the layer. (I used 3 pixels here)
5. Repeat steps 3-4 a bunch of times. I created 15 layers for this example.
6. Flatten the image
7. Run the Normal map filter again, but this time in "Normalize" mode.
8. Yay, you have an "extracted" normal map!
Extracted Normal Map
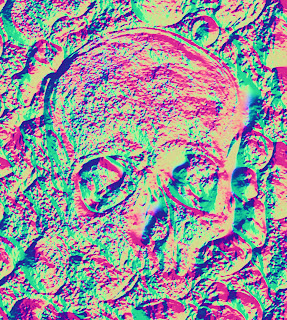 After extracting your Normal map, you can apply it to any surface in your 3d modeling package. Here are some pictures of my normal map applied to a simple plane. This illusion of 3d holds up until the viewer is almost at a 90 degree angle to the viewing surface. It's best used on surfaces that you know the viewer will not be able to get near or are usually seen from a distance.
3d rendering of textured plane with no normal map

3d rendering of same textured plane with normal map
This gives a great sense of depth!
Original Texture

To do this you:
1. run the texture through a normal map filter in your chosen photo manipulation application.
2. Blur the image slightly to remove the fine details (I did not do this step enough on the example)
3. Create a new layer in "overlay" mode
4. Use a Gaussian Blur on the layer. (I used 3 pixels here)
5. Repeat steps 3-4 a bunch of times. I created 15 layers for this example.
6. Flatten the image
7. Run the Normal map filter again, but this time in "Normalize" mode.
8. Yay, you have an "extracted" normal map!
Extracted Normal Map
 After extracting your Normal map, you can apply it to any surface in your 3d modeling package. Here are some pictures of my normal map applied to a simple plane. This illusion of 3d holds up until the viewer is almost at a 90 degree angle to the viewing surface. It's best used on surfaces that you know the viewer will not be able to get near or are usually seen from a distance.
3d rendering of textured plane with no normal map

3d rendering of same textured plane with normal map

This gives a great sense of depth!
Subscribe to:
Posts (Atom)
Navigate
Tools
Blog Archive